

Adding Devices To Home Assistant
Home Assistant Beginner’s Guide 2022 : Part 2
Everything You’ll Need…

Have Home Assistant Up and Running
Check out the Installing Home Assistant Guide if you need help getting Home Assistant up and running

* Optional * - Smart Bulb From TP-Link
This guide will help you add almost any smart home device to Home Assistant. The smart light I added in this video is the Smart Wi-Fi RGB Light Bulb from TP-Link. It’s one of my favorite smart bulbs and it works seamlessly with Home Assistant.
Let’s Get Started

Step 1: Connect your device to your Wifi
TP-Link has the Kasa Smart Home app to connect and manage your devices. I recommend naming the device in the app. I’m naming mine Studio Bulb Right, since I’m adding this bulb to my studio.

Step 2: In Home Assistant, click on Configuration

Step 3: Click on Devices and Service

Step 4: At the bottom right, click the + Add Integration button
Your screen will look different than mine. This is showing everything Home Assistant found on my WiFi network.

Step 5: In the search box, search for the name of your smart device brand. In the case of this bulb, I’m going to search Kasa.

Step 6: Home Assistant may need some more information to find your device, but for Kasa devices, you can leave the host box blank.

Step 7: If Home Assistant found more than one device, select which device you want to add.
This is where it can help by naming your device in the Kasa app since the names shown here are from the Kasa app.

Step 8: This is optional, but I highly recommend adding the device to an area. You can create new areas from this menu.
Areas are like rooms. Having devices in areas can help with controlling multiple devices at once as well as finding them within Home Assistant.

Step 9: When you’re done, click finish. Technically you’re done adding your device to Home Assistant, but I recommend adjusting a few more things before adding anymore devices.
When I was starting out, I adding all of my devices as quickly as possible and then I was overwhelmed with the extra settings I wasn’t aware each device had. Learn from my mistakes.

Step 10: From this page, locate your new device and then click on the 1 Device link.
You can also access your device at the devices tab, but I often find the logo makes it easier to know what device I’m looking at.

Step 11: Here we can see some basic information about our bulb, but click on the name to access even more information.
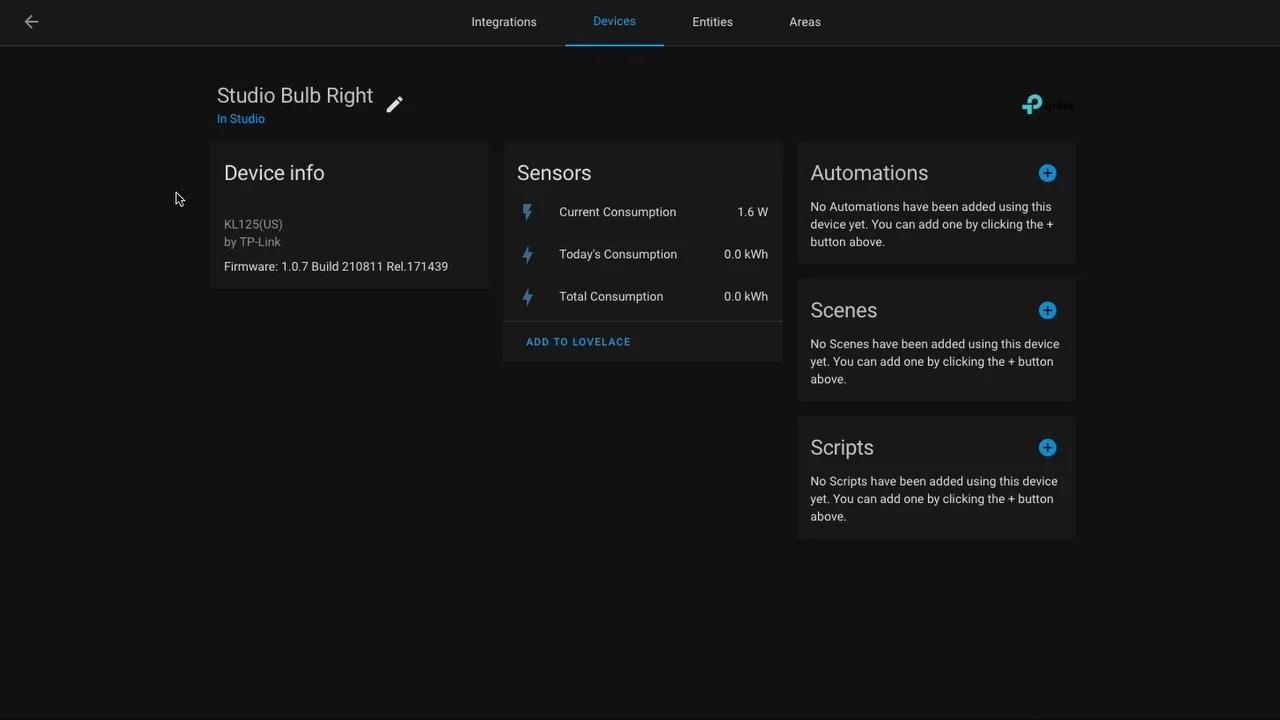
Step 12: Here we can see all of the sensor associated with our bulb, which is our 3 entities. We can also see any Automation, Scenes, or Scripts that our bulb is connected to.
If you click on the pencil, you can rename your bulb, move the area, or disable the bulb.
Under Device Info you can see the firmware, and some devices will also give you a link to go to the companies website/app.

Step 13: On the Overview tab (our main Home Assistant Dashboard) we can see Home Assistant automatically added 2 new cards, one for our Studio Area and one for our Lights.
I have another guide on customizing your Home Assistant Dashboard.

Step 14: If you click on the Studio Bulb, a popup window will let you control more than just turning it on and off. In the case of this bulb, we can change the brightness and color. It will depend on your device.

Step 15: If you click on the gear cog, a settings window will let you change the icon for your device.